Installation Information
FLOOR COATING APPLICATION
5-STEP FLOOR COATING APPLICATION PROCESS
STEP 1 – FLOOR SURFACE DIAMOND GRINDING
Preparation is the most critical phase in any flooring project. LAS Pro Flooring employs cutting-edge diamond grinders paired with a self-contained vacuum system, ensuring an unbreakable mechanical bond to the substrate. Our team will first unload the equipment and assess the concrete’s density to select the most appropriate diamond blades for grinding. We meticulously grind the entire floor surface, a crucial step that profiles the substrate and exposes the concrete material. Additionally, we use a hand grinder to refine the edges. It’s vital that every inch of the floor is fully prepped for the coating application. LAS Pro Flooring uses an epoxy basecoat with a polyaspartic topcoat, which can also be applied to vertical surfaces like cinder blocks, wooden baseboards, steps, and foundation walls. This step also includes the grinding process and cleaning all debris from the surface.
STEP 2 – REPAIRING CRACKS AND CHIPS
Concrete pads often develop hairline cracks over time. Although this is natural, these cracks must be opened using a diamond cutting wheel before being filled with a polyurea filler or mortar. The filler cures in about 25 minutes, leaving the floor smooth and all cracks invisible. Any minor damage, such as salt pits, must also be filled and ground down to achieve a flawless surface. Once grinding is complete, the floor is vacuumed to remove all dust and debris.
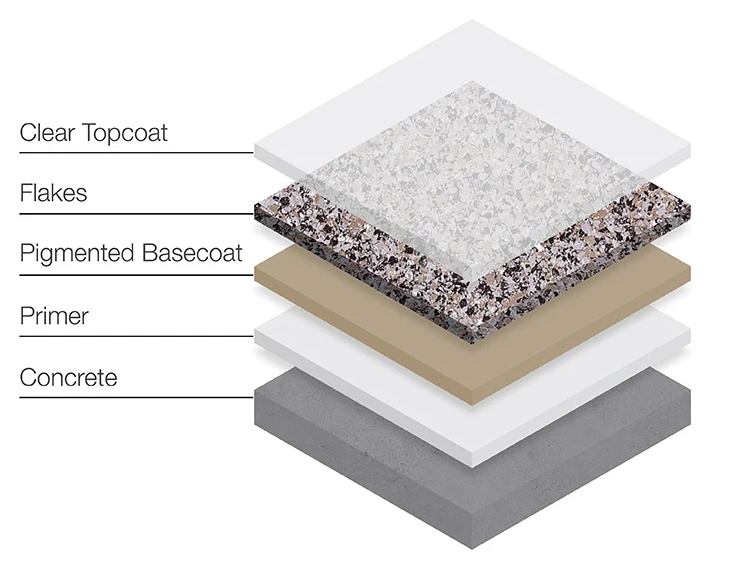
STEP 3 – APPLICATION OF A PIGMENTED ADHESIVE BASE COAT
LAS Pro Flooring applies an epoxy basecoat topped with polyaspartic, available as either a 1-day or 2-day system, depending on the size of your floor. The 1-day system allows for foot traffic and light use the following day (up to 250 pounds), while the 2-day system permits normal use on the second day. Regardless of the system, the floor fully cures 48 hours after completion. We mix two components by adding pigment to the base coat, complemented by our customer’s choice of pre-blended vinyl flakes. We start by rolling the base coat onto all vertical surfaces and applying flakes for 100% coverage. Before applying the base coat to the entire floor surface, our crew vacuums any excess material.
STEP 4 – APPLICATION OF DECORATIVE FLAKES
One crew member rolls the coating onto the floor while another broadcasts vinyl flakes, ensuring 100% coverage by using three times the necessary material. After the floor cures for 60 minutes, we remove any excess flakes, scrape the floor with a flat metal-edge tool to smooth out the flake base coat, and then vacuum again to eliminate any remaining dust and debris.
STEP 5 – APPLICATION OF A CLEAR, DURABLE TOPCOAT
Finally, our crew applies a clear topcoat using a squeegee, followed by back-rolling to ensure an even, thick, and durable finish. The topcoat requires:
- 12 hours to cure for light foot traffic
- 24 hours for regular use
- 48 hours before returning contents to the garage
- 96 hours for vehicle traffic
LAS Pro Flooring can advise you on curing times, as environmental factors may affect these periods. Afterward, we clean your site and reload our equipment into our mobile truck.
LAS Pro Flooring Offers a 7-Year Limited Warranty
Every floor coating project completed by LAS Pro Flooring comes with a 7-year limited warranty. Customers receive a signed warranty certificate that includes the date of purchase and comprehensive details of the warranty coverage, ensuring peace of mind and long-lasting satisfaction.